Have you put the heat on in your home yet? We have been trying to resist turning on the heat as long as possible.
I have been doing more cooking and baking in the evening and that seems to be all we need for now. My cookie dough experiments have been keeping us warm.
The end results of this experiment are some sort of cookie bars that happened when I tried to figure out the proportions of wet to dry ingredients.
I tried one recipe that called for 1 stick of butter and 1 egg. The dough was impossibly dry and the cookies never flattened out. They stayed in nearly the original dough ball shape.
Another recipe called for 2 sticks of butter and 2 eggs. I gave this a try next
The results were a dough that was way too wet and the cookies flattened and spread too much. It was a disaster.
Here is a picture only halfway through the baking
They were practically crepes…
So I made a makeshift baking pan out of some nonstick aluminum foil and I ended up with cookie bars.
These are not what I planned to make, but they are pretty good. A cake-like cookie.
My experiments will continue, and when I figure it all out, I’ll share the recipe. Until then I am like a mad scientist, creating cookie monsters in my lab.
What could be more fun and festive than a Halloween pumpkin patch of your own, right on your dinner plate? These little cuties are made from sweet potatoes, baked to crispy perfection! Fun, delicious, and the perfect comfort food on a chilly Autumn day!
These little cuties are made from sweet potatoes, baked to crispy perfection!
I don’t like to share a recipe that I have not yet tweaked to near perfection, but I’m sharing this one early because it’s a Halloween recipe. At the end of the article, I will talk about how I will be changing and hopefully improving this process for next time.
So here are the basics of how to make them!
Ingredients:
Sweet Potatoes, the bigger the better!
Cooking oil. Whatever oil you prefer. I used Avocado oil.
Seasoning. Whatever combination of seasonings you prefer. I used 2 teaspoons of Old Bay in this recipe, but in the future, I will be using my custom “Gadzooks” seasonings instead. These would probably also be great with pumpkin-pie seasonings as well….and maybe even marshmallows for a sweet treat!
Cornstarch: 2 Teaspoons, (though I am not yet convinced this was necessary (more on that below.))
Instructions:
Buy some nice plump sweet potatoes, the bigger the better.
2. Slice the sweet potatoes about a quarter or a third of an inch thick. A mandolin slicer is the safest and quickest way to go.
Soak the slices in water to remove the starch so that they get nice and crispy when baked.
3. Use pumpkin-shaped cookie cutters on each sweet potato slice.
4. Cut faces into the pumpkin cut-outs.
5. Toss the slices in oil, making sure to cover all slices completely. (make sure the slices are nice and dry before adding the oil. This will help them crisp better.)
6. Add Seasoning to the oil-covered slices. I suggest doing this in a plastic bag, shake and bake style.
7. Bake 425 degrees. On parchment paper or non-stick aluminum foil. 15 minutes on one side, then flip and cook for an additional 15 minutes. Don’t overcrowd your baking sheet! They need some space to get properly crispy.
That’s it! Enjoy!
Notes, Fixes, and Updates:
Slicing: This is the first spot where my plan needs some improvement. I used a mandolin slicer to do this which should be quick easy work, but it was not. The sweet potatoes were so firm that it was difficult to slice through them. Maybe pre-cooking them slightly would make this work better.
Soaking: I soaked the slices in water to remove the starch so that they would bake to crispy perfection. After scouring the internet, for tricks and tips to get sweet potatoes crispy, some sources seemed to say that the key to a crispy sweet potato is removing the starch by soaking, while other recipes claimed that the key was in adding corn starch to the seasonings. Why remove the starch and then add it back in again? I am not sure, and need to do more experimenting!
Cookie Cutter: When I used my cookie cutter on each sweet potato slice, again, the slices were so firm that this was quite difficult. I had to use my meat tenderizing rubber mallet to get the cookie cutter to cut through the slices.
Faces: When I cut faces into the pumpkin cut-outs, once again this was difficult because the raw sweet potatoes were so firm.
Oiling and Seasoning: I used Old Bay seasoning, but I am not a big fan of the celery salt in Old Bay seasoning, so I think I would change the seasonings to my custom “Gadzooks” blend of:
1 tsp Oregano
1/2 tsp pepper
1/2 tsp Garlic Powder
1/4 cup shredded parmesean cheese.
Baking: I ran out of parchment paper, so I had to use aluminum foil. I think they would be better on parchment. I pulled mine from the oven 5 minutes early, but I think they would have been better and more crispy if I went the full time. Also maybe a little blast from the air fryer setting would probably help as well.
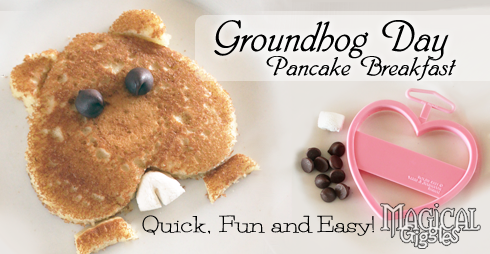
Sure…it’s groundhog day, and we all know what that means. It’s the one magical day each year that we all collectively lose our minds and look to a fortune telling rodent for answers.
We can chalk this up to the fact that being cooped up indoors may have started to adversely effect our mental capacity, but instead of seeking help for our addiction to psychic rodent prognostication we can just embrace the insanity and celebrate it for all of its goofy silliness!
What better way to start your Groundhog Day with with a nice hearty breakfast in the shape of today’s meteorologist of honor, the groundhog himself. It literally only takes minutes!
Here’s what you’ll need;
Marshmallows
Chocolate Chips
A heart shaped cookie cutter
Pancake mix or the frozen pre-made pancakes (we used Aldi’s Gluten Free, because we believe that the Glutens should run wild and free, and prance through meadows – and stay the heck away from our intestines)
Press the cookie cutter into the pancake, and use the spare parts to make little half circle ears, and some paws if you’d like.
Add the chocolate chips for eyes and cut a marshmallow in the shape of teeth, and you are done!
A fun and festive breakfast to start your day in groundhog jubilee! For extra fun, pour your syrup off to the side in the shape of a shadow, and/or sprinkle powdered sugar as snow.
Happy Groundhog Day!
P.S. Punxsutawney Phil and Holsville Hal both predict an early Spring! Yippee!!
However, no prediction has been made by this actress.
Orange is the New Black’s Pennsatucky is not a groundhog and is not in any way related to Punxsutawney Phil. She may or may not be able to predict weather trends better than a groundhog – more research is needed. Always consult an actual groundhog before making any weather related decisions. Thank you.
This Kentucky Derby staple was brand new to us, and it definitely received rave reviews from all in attendance at our Kentucky Derby Soiree! I didn’t take any pictures of the process of making the spread or the canapes, but I’ll do my best to describe it all! The ingredients were just the basics: 1 block of Cream Cheese 1/4 cup of Sour Cream 1 whole Cucumber, finely grated 1/4 of a White Onion, finely minced The key to this recipe was the draining of the excess moisture from the Cucumber and the onion. The way we accomplished this was by pressing in a fine mesh colander lined with paper towels. It was a lot of pressing and squeezing, because cucumbers hold a tremendous amount of water, but it was well worth it in the end! Combine the Cream Cheese and the Sour Cream and then add the well drained minced onions and cucumber — that’s pretty much it! We made ours the night before to give it some time for all the flavors to mingle. The canapes were made by spreading the Benedictine Spread between two slices of soft fresh white bread and then stamping them out with a canape cutter. The garnish is thinly sliced cucumber. In my research I found that many people make this spread with green pepper Tabasco Sauce, which gives it both a little kick of spice as well as it’s signature light green coloring. We didn’t have any of the green Tabasco Sauce, and it just didn’t feel right to add green dye, so ours is in it’s natural white. I slightly regret the lack of green now because it makes it very difficult to see the spread between the slices of white bread (especially in pictures) — it still tastes fantastic though! In my research about this Derby Day treat, I found that Benedictine Spread was created in Louisville Kentucky by a fellow Jenny (Jennie Carter Benedict)– so you know I had to give this recipe a try! For more Kentucky Derby check out the links below to other Magical Giggles articles packed full of Kentucky Derbydecorating inspiration and winning recipes for yummy treats like Benedictine Spread and Kentucky Hot Browns! Kentucky Derby Decorating Inspiration Benedictine Spread Recipe Kentucky Hot Browns Recipe Mini Derby Pie Recipe
Welcome Springtime! I am always up for a cupcake party, and the First Day of Spring is a perfect excuse for one! We had intended to make these cupcakes as a St Patrick’s Day treat — sort of an end-of -the-rainbow pot-of-gold Leprechaun thing — but the time got away from us and we didn’t make that deadline. Instead these cupcakes are in celebration of the first day of Spring (even if it does look like Springtime on the North Pole right now outside). They are Key Lime cake with a cloud of Vanilla frosting swirled high and a candy rainbow on top. The taste is light and fresh and everything one could hope for in a springtime treat!
Here are all the details!
We used a Pillsbury box cake mix! *gasp* We didn’t even change anything — we just followed the directions on the box. I can’t remember where we got this cake mix, but I think it was Walmart or Target — it seems to be a seasonal item that comes and goes throughout the year. It is delicious. I wish I could claim it as my own recipe! It’s light and fresh and the key lime flavor is divine.
The rainbows are made from Air Heads Extremes: Sweetly Sour Candy Rainbow Berry. We picked them up at Walmart — $1.38 for a pack of 20 (just 4 short of the 24 needed for all my cupcakes!). They taste sour and then sweet. When combined with the fresh Key lime flavor of the cake and creamy vanilla in the frosting, they add an extra dimension to the flavor — unexpected and simply scrumptious! The dry cake mix is oddly white, and we thought we were going to have to add food coloring, but as soon as we mixed in the eggs, oil and water, the green color came out — I guess it’s powdered color suspended in the mix. Warning, this batter is thick and nearly killed our electric hand mixer. The box says to beat the batter for 2 minutes. We were not able to do that so we just used the whisk and a lot of arm power. It was so thick that it felt like scooping heavy pudding into the cupcake cups! At that point we thought it was not going to turn out well at all, but thank goodness we were wrong!
When they were cooled we loaded up our pastry bag (more of a pastry tube — like a calking gun for cooking) with Vanilla frosting and swirled on the vanilla ‘cloud’ with a decorative tip. The Airhead Extremes are a little bit too long straight from the package, so we cut about an inch off of each strip with kitchen sheers. When the strips are too long, the rainbows tend to warp and topple, so this simple snip solves that problem (and also leaves you with ‘extra’ candy bits for snacking). We just tucked each end into the creamy cloud to create the rainbow and they held in place beautifully. The tangy sour taste of the candy complimented the cupcake and frosting very nicely! And that was that! A perfect light and yummy Key Lime Cuppycake to celebrate the very first day of Spring! After such a long hard winter, we all deserve a nice springtime treat!
Top ‘O the mornin’ to ya! Here’s hoping that you don’t get pinched, and that you find your pot of gold! This year we pulled it all together for a St. Patrick’s Day feast!
We kicked around lots of ideas for St. Patrick’s dinner that would be outside the box of the traditional corned beef and cabbage, but the old standard came back by popular demand. I had a hard time convincing Peggo that we should try corned beef one more time before giving up on this St. Patrick’s day staple. A sale on corned beef and the fact that I scored a free slow cooker from Sears (Shop Your Way Rewards..yippeee) was all we needed as a nudge to give it one more try. We cooked the corned beef in the slow cooker for 8 hours and it came out perfectly! It was tender and juicy and flavorful — a true delight even for a non-meat-lover like me.
This year even Peggo agreed this was the best corned beef we ever made. It also cut like a dream instead of being too tough or too crumbly. We will definitely be using the slow cooker again! We steamed all the veggies separately and they were awesome and flavorful as they always are when steamed.
We also made two loaves of Irish Soda Bread this year. The first loaf was the traditional bread with raisins and caraway seeds, because our Evie loves the traditional kind and she specifically requested that kind. Peggo does not like raisins and Feather cannot eat seeds, so for our second loaf we decided to get a little bit wild and break tradition by adding only dried cranberries to the dough.
Both of loaves have received rave reviews by family members who gobbled them up like happy little Leprechauns, so it looks like everyone is happy with their St. Patrick’s treats this year! I so wish that I had taken pictures of all the baking and cooking, but it just didn’t happen — but there’s always next year! We’re just three days away from Spring now. We’ll soon be seeing lots of green outdoors — which makes it much easier to pack up all the festive green decorations. Hippity Hoppity, Easter’s on it’s way! Keep chasing rainbows! Your pot of gold is out there!
Happy St. Patrick’s Day! With an Irish name like Hickey, people kind of expect us to celebrate good ole St. Patty’s Day. After discovering that the ‘traditional’ St. Patrick’s Day dinner of Corned Beef and Cabbage may NOT even be a traditional Irish dish, we decided to explore the alternatives.
This is our biggest Fat Tuesday/Mardi Gras celebration yet! Though in all fairness, the most we did to celebrate in the past was eat on Mardi Gras paper plates! This year, aside from the decorating, and the King Cake and watching Disney’s The Princess and the Frog (set in New Orleans and gorgeous!) we also had a yummy Fat Tuesday dinner! Peggo made AMAZING Monte Cristo sandwiches, and we all loved them! She followed the recipe from the Blue Bayou restaurant in New Orleans Square in Disneyland (recipe below) and it was seriously dee-lish! Though I wasn’t able to capture the entire process/recipe in pictures, I did get a few! The Monte Cristo is basically just a turkey, ham, and swiss sandwich dipped in batter and fried. It’s served with powdered sugar and some fresh raspberry jam/preserves. It really doesn’t sound like flavors that would go together, but somehow it really does work!
Here is one in all it’s deep fried glory, fresh out of the pan…
…before Peggo so artfully cut it on the diagonal, plated it, sprinkled it with powdered sugar and put a little raspberry jam/preserves on the side.
It looked and smelled and tasted divine! This is all quite a departure from our usually healthy meals — not a steamed veggie to be found here! Tomorrow we’ll have something extra healthy and nutritious for dinner balance it out…if we can resist that left-over King Cake!
Happy Fat Tuesday and Mardi Gras celebration Y’all!!
Disneyland Blue Bayou Monte Cristo Sandwich
Serves 4
Ingredients:
1 egg
1 3/4 cups plus 2 tablespoons water
1 3/4 cups all-purpose flour
1/4 teaspoon salt
1 teaspoon baking powder
8 slices egg bread (challah works well), sliced 1/2-inch thick
8 thin slices ham
8 thin slices turkey
8 thin slices Swiss cheese
3 cups canola oil
Confectioners sugar
Raspberry preserves
Directions:
Line a cookie sheet with paper towels; set aside.
Whisk the egg and water together in a mixing bowl. Add flour, salt, and baking powder and whisk thoroughly for 2 to 3 minutes or until smooth, scraping sides of bowl.
On one slice of bread, arrange 2 slices of ham, turkey, and cheese, covering the bread evenly. Place another slice of bread on top and slice each sandwich in half diagonally.
Heat oil to between 365 degrees F and 375 degrees F in a 10-inch pan. Do not let the oil reach a higher temperature than this; if the oil starts to smoke, turn the heat down. Dip half of the sandwich into the batter, allowing excess to drain, and very carefully place into the oil.
Repeat with the other sandwich half. Cook 3 minutes on each side, or until golden brown. Place the cooked sandwich on the prepared cookie sheet in a warm oven until ready to serve. Repeat with the other three sandwiches.
Cook one at a time, and allow the oil to reach the desired temperature between each.
Sprinkle with confectioner’s sugar and serve with raspberry preserves on the side.
Read more about our Mardi Gras decorating fun HERE! Read more about our Mardi Gras King Cake HERE!
Happy Fat Tuesday and Mardi Gras Celebration! I have to admit, I have never tasted King Cake. I don’t know what makes a King Cake good or bad. I do know that I wanted a festive treat for Mardi Gras and King Cake is one of the most festive looking Mardi Gras treats around. Please look away now if you are from New Orleans, or have tasted the real King Cake, because I have made a quickie version of a King Cake-like treat that probably pales in comparison to the real thing. It’s a giant cinnamon bun twisted/ braided into a big wreath-like cake, with the cinnamon bun frosting covered in Mardi Gras colored sugar. It was a lot of messy fun to make, and I would have taken more pictures of the process, but my hands were covered in sticky cinnamon filling and I didn’t want to have a cinnamon flavored camera — because I would have to eat that too. So, this is the only in-progress picture, but I think its says it all.
I mentioned in a past post, that I have made my own colored sugar for the first time this year. It was easy and fun! In case you missed it, here are the full and excessively lengthy instructions; – put some sugar in a ziplock bag – add a few drops of food coloring – shake-a, shake-a, shake-a – the end The tradition is to hide a baby charm in the King Cake. The lucky person to get the piece with the baby in it will be blessed with good luck and prosperity. Choking hazards aside, I’m wishing you all find the piece with the baby! Good luck and prosperity to you! Happy Fat Tuesday!
UPDATE: We just served it! Here it is cut open! I have not tasted the King Cake yet because I am still happily stuffed from eating THESE divine Monte Cristo sandwiches that Peggo made, but so far two of us have tried it and there are two thumbs up so far! Not bad for a quickie substitute idea! UPDATE again: I tried it. *swoon* 4 out of 4 thumbs up so far! Best served warm. YUM!
Nitty Gritty Notes – We used two cans of Jumbo Cinnamon Roll dough from Aldi (2@$2.39) — the kind that explodes when you unwrap the cardboard can. Each can contains 5 rolls. We unrolled all the rolls into strips, and made two groups of 5. We loosely grouped/stacked the strips and then twisted them together. The twisted dough was loosely shaped into a wreath-like shape with only minimal efforts to tuck/blend the edges.
All of the dough shaping was on Non-Stick foil on a sheet pan that was also used for baking it. The directions on the can said to bake 18-22 minutes at 375. We were using two cans at once so we tried 22 minutes and then pulled it out and poked at it a few minutes before deciding to toss it back in for 8 minutes longer at 350. It came out PERFECT.
We used the frosting that came in the cans of dough, and frosted them with a flexible silicone spatula while they were fresh and hot, working quickly and covering the entire ‘cake’ with frosting before sprinkling the colored sugar on top before the icing cooled/set.
What better way to start your Valentine’s Day than with some pink chocolate chip pancakes with whipped cream on top and fresh strawberry hearts on the side? We actually made these Valentine’s Day Pancakes – ON Valentines Day! Trust me, this is a small miracle, as we tend to PLAN a lot of things that never really make it into reality, or make it on their own unique time table, usually after the holiday, but this time – voila! Pink Pancakes! I’d be lying if I said that this blog and the need for content and quality pictures wasn’t a HUGE motivator for getting these plans into action. But when you think about it, the whole point of this blog is to celebrate and appreciate more. I actually AM doing that. I’ve always said that having little ones in your life makes you appreciate and celebrate more. Even if you don’t really feel like coloring eggs or putting up the tree or all the other traditional holiday activities, you will do it for them – to create those lifetime memories and traditions. But what about when there are no little ones in your life? Do you stop celebrating and appreciating? When a family is at that awkward in-between stage where there are no little ones, sometimes it feels like all holidays are on hold – which to me feels like all of life is on hold. For now, this blog is my baby, and I am devoting myself to giving it everything I can – creating beautiful and memorable holidays and a home full of love. So, kids or no kids we are going to celebrate like we’re in kindergarten! Starting with PINK PANCAKES! We bought this festive Valentines pancake mix at Aldi. It’s pink and has chocolate chips – what more could I possibly ask for?
We tried, oh how we tried, oh so hard to make these pancakes heart shaped. We used our little silicone heart shape specially designed for this, but it was bent out of shape from being in storage, so the batter was leaking out the edges.
So we ended up making traditional round pancakes instead – well, sort of round…..round-ish.
In the end we had a lovely holiday pancake breakfast and a sense of accomplishment that we went that extra mile to celebrate not for any actual children, but for the sake of each of our own inner children. You could almost hear the magical giggles as we served these.
Valentine’s Day breakfast checked off the to-do list!